
The text and images below show examples of resources and research of specific print techniques which I will go on to feature as the content in my Top Ten ISSUU print manual (which will go on to be published on my Design Practice blog)
DIE CUT
DEFINITIONS OF DIE CUTTING
A method for punching or cutting out any special shapes by using a
metal form that is called a die. Also used to refer to the cut out
shape. Can be used with paper or fabric.
A die is a specialized tool used in manufacturing industries to cut or
shape material using a press. Like molds, dies are generally customized
to the item they are used to create. Products made with dies range from
simple paper clips to complex pieces used in advanced technology.
A die is a specialized tool used in manufacturing industries to cut or shape material using a press. Like molds, dies are generally customized to the item they are used to create. Products made with dies range from simple paper clips to complex pieces used in advanced technology.
Forming dies are typically made by tool and die makers and put into production after mounting into a press. The die is a metal block that is used for forming materials like sheet metal and plastic. For the vacuum forming of plastic sheet only a single form is used, typically to form transparent plastic containers (called blister packs) for merchandise. Vacuum forming is considered a simple molding thermoforming process but uses the same principles as die forming. For the forming of sheet metal, such as automobile body parts, two parts may be used, one, called the punch, performs the stretching, bending, and/or blanking operation, while another part, called the die block,
securely clamps the workpiece and provides similar, stretching,
bending, and/or blanking operation. The workpiece may pass through
several stages using different tools or operations to obtain the final
form. In the case of an automotive component there will usually be a
shearing operation after the main forming is done and then additional
crimping or rolling operations to ensure that all sharp edges are hidden
and to add rigidity to the panel.
Die components
The main components for Die Toolsets are:
- Die block - This is the main part that all the other parts are attached to.
- Punch plate - This part holds and supports the different punches in place.
- Blank punch - This part along with the Blank Die produces the blanked part.
- Pierce punch - This part along with the Pierce Die removes parts from the blanked finished part.
- Stripper plate - This is used to hold the material down on the Blank/ Pierce Die and strip the material off the punches.
- Pilot - This is used to keep the material being worked on in position.
- Guide / Back gage / Finger stop - These parts are all use to make sure that the material being worked on always goes in the same position, within the die, as the last one.
- Setting Block - This part is used to control the depth that the punch does into the die.
- Blanking Dies - See Blanking Punch
- Pierce Die - See Pierce Punch.
Die operations and types
Die operations are often named after the specific type of die that
performs the operation. For example a bending operation is performed by a
bending die. Operations are not limited to one specific die as some
dies may incorporate multiple operation types:
- Bending: The bending operation is the act of bending blanks at a predetermined angle. An example would be an "L" bracket which is a straight piece of metal bent at a 90° angle. The main difference between a forming operation and a bending operation is the bending operation creates a straight line bend (such as a corner in a box) as where a form operation may create a curved bend (such as the bottom of a drink can).
- Blanking: A blanking die produces a flat piece of material by
cutting the desired shape in one operation. The finish part is referred
to as a blank. Generally a blanking die may only cut the outside
contour of a part, often used for parts with no internal features.
Three benefits to die blanking are:
- Accuracy. A properly sharpened die, with the correct amount of clearance between the punch and die, will produce a part that holds close dimensional tolerances in relationship to the parts edges.
- Appearance. Since the part is blanked in one operation, the finish edges of the part produces a uniform appearance as opposed to varying degrees of burnishing from multiple operations.
- Flatness. Due to the even compression of the blanking process, the end result is a flat part that may retain a specific level of flatness for additional manufacturing operations.
- Broaching: The process of removing material through the use of multiple cutting teeth, with each tooth cutting behind the other. A broaching die is often used to remove material from parts that are too thick for shaving.
- Bulging: A bulging die expands the closed end of tube through the use of two types of bulging dies. Similar to the way a chefs hat bulges out at the top from the cylindrical band around the chefs head.
- Bulging fluid dies: Uses water or oil as a vehicle to expand the part.
- Bulging rubber dies: Uses a rubber pad or block under pressure to move the wall of a workpiece.
- Coining: is similar to forming with the main difference being that a coining die may form completely different features on either face of the blank, these features being transferred from the face of the punch or die respectively. The coining die and punch flow the metal by squeezing the blank within a confined area, instead of bending the blank. For example: an Olympic medal that was formed from a coining die may have a flat surface on the back and a raised feature on the front. If the medal was formed (or embossed), the surface on the back would be the reverse image of the front.
- Compound operations: Compound dies perform multiple operations on the part. The compound operation is the act of implementing more than one operation during the press cycle.
- Compound die: A type of die that has the die block (matrix) mounted on a punch plate with perforators in the upper die with the inner punch mounted in the lower die set. An inverted type of blanking die that punches upwards, leaving the part sitting on the lower punch (after being shed from the upper matrix on the press return stroke) instead of blanking the part through. A compound die allows the cutting of internal and external part features on a single press stroke.
- Curling: The curling operation is used to roll the material into a curved shape. A door hinge is an example of a part created by a curling die.
- Cut off: Cut off dies are used to cut off excess material from a finished end of a part or to cut off a predetermined length of material strip for additional operations.
- Drawing: The drawing operation is very similar to the forming operation except that the drawing operation undergoes severe plastic deformation and the material of the part extends around the sides. A metal cup with a detailed feature at the bottom is an example of the difference between formed and drawn. The bottom of the cup was formed while the sides were drawn.
- Extruding: Extruding is the act of severely deforming blanks of metal called slugs into finished parts such as an aluminum I-beam. Extrusion dies use extremely high pressure from the punch to squeeze the metal out into the desired form. The difference between cold forming and extrusion is extruded parts do not take shape of the punch.
- Forming: Forming dies bend the blank along a curved surface. An example of a part that has been formed would be the positive end(+) of a AA battery.
- Cold forming (cold heading): Cold forming is similar to extruding in that it squeezes the blank material but cold forming uses the punch and the die to create the desired form, extruding does not.
- Roll forming: a continuous bending operation in which sheet or strip metal is gradually formed in tandem sets of rollers until the desired cross-sectional configuration is obtained. Roll forming is ideal for producing parts with long lengths or in large quantities.
- Horning: A horning die provides an arbor or horn which the parts are place for secondary operations.
- Hydroforming: Forming of tubular part from simpler tubes with high water pressure.
- Pancake die: A Pancake die is a simple type of manufacturing die that performs blanking and/or piercing. While many dies perform complex procedures simultaneously, a pancake die may only perform one simple procedure with the finished product being removed by hand.
- Piercing: The piercing operation is used to pierce holes in stampings.
- Progressive die: Progressive dies provide different stations for operations to be performed. A common practice is to move the material through the die so it is progressively modified at each station until the final operation ejects a finished part.
- Shaving: The shaving operation removes a small amount of material from the edges of the part to improve the edges finish or part accuracy. (Compare to Trimming).
- Side cam die: Side cams transform vertical motion from the press ram into horizontal or angular motion.
- Sub press operation: Sub-press dies blank and/or form small watch, clock, and instrument parts.
- Swaging: Swaging (necking) is the process of "necking down" a feature on a part. Swaging is the opposite of bulging as it reduces the size of the part. The end of a shell casing that captures the bullet is an example of swaging.
- Trimming: Trimming dies cut away excess or unwanted irregular features from a part, they are usually the last operation performed.
- what do you call upper part of die and lower part of die..?
Steel-rule die
Steel-rule dies, also known as cookie-cutter dies, are used to cut sheet metal and softer webs, such as plastics, wood, cork, felt, fabrics, and cardboard. The cutting surface of the die is the edge of hardened steel strips, known as steel rule. These steel rules are usually located using saw-cut grooves in plywood. The mating die can be a flat pieces of hardwood
or steel, a male shape that matches the workpiece profile, or it can
have a matching groove that allows the rule to nest into. Rubber strips
are wedged in with the steel rule to act as the stripper plate; the
rubber compresses on the down-stroke and on the up-stroke it pushes the
workpiece out of the die. The main advantage of steel-rule dies is the
low cost to make them, as compared to solid dies; however, they are not
as robust as solid dies, so they usually only used for short production
runs.
Rotary die
In the broadest sense, a rotary die is a circular shaped die
that may be used in any manufacturing field. However, it most commonly
refers to circular shaped dies used to process soft webs, such as paper
and cardboard. Two dies are used, one has cutting and creasing rules,
while the other acts as the anvil. Rotary dies are faster than flat
dies, but not as accurate.
Wire pulling
Wire-making dies have a hole through the middle of them. A wire or rod of steel, copper, other metals, or alloy
enters into one side and is lubricated and reduced in size. The leading
tip of the wire is usually pointed in the process. The tip of the wire
is then guided into the die and rolled onto a block on the opposite
side. The block provides the power to pull the wire through the die.
The die is divided into several different sections. First is an
entrance angle that guides the wire into the die. Next is the approach
angle, which brings the wire to the nib, which facilitates the
reduction. Next is the bearing and the back relief. Lubrication is added
at the entrance angle. The lube can be in powdered soap form. If the
lubricant is soap, the friction of the drawing of wire heats the soap to
liquid form and coats the wire. The wire should never actually come in
contact with the die. A thin coat of lubricant should prevent the metal
to metal contact.
For pulling a substantial rod down to a fine wire a series of several
dies is used to obtain progressive reduction of diameter in stages.
Standard wire gauges
used to refer to the number of dies through which the wire had been
pulled. Thus, a higher-numbered wire gauge meant a thinner wire. Typical
telephone wires were 22-gauge, while main power cables might be 3- or 4-gauge.
http://en.wikipedia.org/wiki/Die_%28manufacturing%29
DESIGN EXAMPLES OF THE DIE CUT PRINT FINISH PROCESS


DESIGN EXAMPLES OF THE DIE CUT PRINT FINISH PROCESS


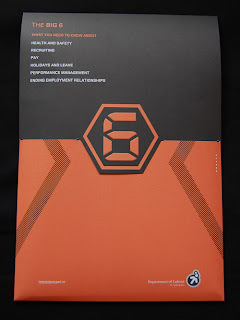
The Big 6, Tim Hansen.
Great use of spot colour orange for a high-impact visual- a brilliant contrast to the matte black print finish throughout the majority of the design.


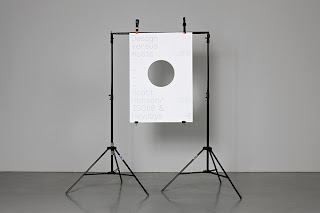
Design versus music, Heydays.
Really love this innovative design- so visually communicative and simple- I've never seen a die cut technique utilised in such a way before- truly unique.


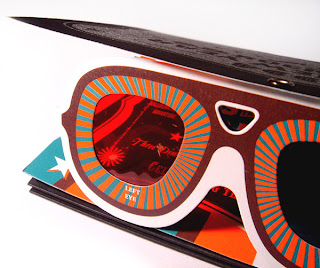
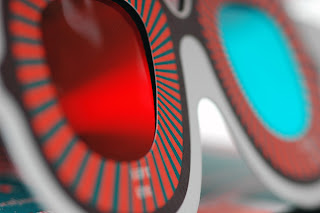
Calendar with 3D glasses.
A fun project- with hand-made, die cut 3D glasses in a unique and ununiformed style. Great pattern on the glasses to visually communicate and replicate the effects of three dimensional viewing.
DEBOSS
THE DEFINITIONS OF DEBOSS
THE DEFINITIONS OF DEBOSS
To indent (a figure or design) into a surface: The design on the book's cover is debossed.
To press a design into a metal surface.


EMBOSS
THE DEFINITIONS OF EMBOSS
Embossing is the process of creating a three-dimensional image or design in paper and other materials.
Techniques
Embossing is typically accomplished by applying heat and pressure with male and female dies, usually made of copper or brass, that fit together and squeeze the fibers of the substrate. The combination of pressure and heat raises the level of the image higher than the substrate, while "ironing" it to make it smooth. In printing this is accomplished on a letterpress. The most common machines are the Kluge Letterpress and the Heidelberg Letterpress.
"Debossing" is similar to embossing, but recesses the design rather than raising it.
Most types of paper can be embossed, and size is not normally a consideration. Embossing without ink, so that the image is raised but not colored, is called "blind embossing." Embossing used in conjunction with ink, so that the raised area is colored, is called "color register embossing." Embossing used in conjunction with foil stamping is called "combination stamping" or "combo stamping."
Embossing involves a separate stage in the production process, after any varnishing and laminating. It requires a separate press run, and is priced accordingly. In addition to being used as a design element, embossing can be used to improve the performance of paper products like napkins, diapers, and tissue paper.
DESIGN EXAMPLES OF THE EMBOSS FINISH PROCESS

http://www.underconsideration.com/fpo/archives/2011/03/344-loves-you-card.php
344 Loves You Thank You Card.
Beautiful example of blind emboss techniques combined with unique and styalised typography in a visually engaging design.

http://www.underconsideration.com/fpo/archives/2011/08/condiments-entrails-book.php
Condiments & Entrails book- a perfect bound CMYK print publication with illustrative typography embossed on the cover for a sophisticated and tactile print finish.
THE DEFINITIONS OF EMBOSS
- Carve or mold a design on (a surface) so that it stands out in relief
- - an embossed brass dish
- Decorate (a surface) with a raised design
1. To mold or carve in relief: emboss a design on a coin.
2. To decorate with or as if with a raised design: emboss leather.
3. To adorn; decorate.
1. To raise or represent (surface designs) in relief.
2. To decorate (a surface) with raised ornament.
3. Metalworking . to raise a design on (a blank) with dies of similar pattern, one the negative of the other.
4. To cause to bulge out; make protuberant.
Paper embossing
Embossing is typically accomplished by applying heat and pressure with male and female dies, usually made of copper or brass, that fit together and squeeze the fibers of the substrate. The combination of pressure and heat raises the level of the image higher than the substrate, while "ironing" it to make it smooth. In printing this is accomplished on a letterpress. The most common machines are the Kluge Letterpress and the Heidelberg Letterpress.
"Debossing" is similar to embossing, but recesses the design rather than raising it.
Most types of paper can be embossed, and size is not normally a consideration. Embossing without ink, so that the image is raised but not colored, is called "blind embossing." Embossing used in conjunction with ink, so that the raised area is colored, is called "color register embossing." Embossing used in conjunction with foil stamping is called "combination stamping" or "combo stamping."
Embossing involves a separate stage in the production process, after any varnishing and laminating. It requires a separate press run, and is priced accordingly. In addition to being used as a design element, embossing can be used to improve the performance of paper products like napkins, diapers, and tissue paper.
Notary use
A notary public frequently uses embossing to mark legal papers, either in the form of an adhesive seal, or using a clamp-like embossing device used to certify (a signature on a document, contract, etc.) or cause to become certified through a notary public or bill.
A notary public frequently uses embossing to mark legal papers, either in the form of an adhesive seal, or using a clamp-like embossing device used to certify (a signature on a document, contract, etc.) or cause to become certified through a notary public or bill.
Postage stamps
Embossing has been used regularly on postage stamps. The embossed paper of a letter sheet or stamped envelope is called an indicium. Notable early examples include some of the earliest stamps of Italy, Natal, and Switzerland, as well as the early high values of Britain. Modern stamps still sometimes use embossing as a design element.
http://www.underconsideration.com/fpo/archives/2011/03/344-loves-you-card.php
344 Loves You Thank You Card.
Beautiful example of blind emboss techniques combined with unique and styalised typography in a visually engaging design.

http://www.underconsideration.com/fpo/archives/2011/08/condiments-entrails-book.php
Condiments & Entrails book- a perfect bound CMYK print publication with illustrative typography embossed on the cover for a sophisticated and tactile print finish.
FLOCKING
THE DEFINITIONS OF FLOCKING

Here’s my ever faithful screenprinting setup with my makeshift flocking
box next to it. I did the first 50 covers myself as a test, but will
have assistants later, so it was helpful to have the box right next to
the screen.

The company through which I bought the flocking fibers also sells a water-based adhesive
which has a lengthy enough working time to be able to screenprint with it just like ink.

Since only a small part of the cover was to be flocked, I used a box just large enough for half the cover. The bottom of the box is lined with wax paper, so all that extra flocking that’s piled there can be dumped out easily and placed back into the flocking applicator bottle (you can just barely see the tip of it in the lower right, it’s just a plastic squeeze bottle).

With the adhesive freshly printed, place the cover inside the box, and puff the flocking fiber over the sticky area until covered. Flip over and tap to remove excess fiber.

This is what you’re left with after tapping; still too much. The water-based adhesive can be cured in a 300 degree oven for 5 minutes, then brushed clean with a soft paint brush or towel.


THE DEFINITIONS OF FLOCKING
A velvetlike pattern produced on wallpaper or cloth decorated with flock.
To texture or pattern with pulverized wool or felt.
HOW TO APPLY FLOCKING TO DESIGNS
http://www.radrobot.org/2010/03/bearfight-flocking-process/
Bearfight Flocking Process
How about a process post about flocking? If you don’t know, flocking is made up of powdered rayon fibers, which when adhered to any object with the proper adhesive, creates a fuzzy, felt-like texture. All 77 contributing artist copies, as well as the first 200 of the run of 500 will have the “BEARFIGHT” title flocked in white.The company through which I bought the flocking fibers also sells a water-based adhesive
which has a lengthy enough working time to be able to screenprint with it just like ink.
Since only a small part of the cover was to be flocked, I used a box just large enough for half the cover. The bottom of the box is lined with wax paper, so all that extra flocking that’s piled there can be dumped out easily and placed back into the flocking applicator bottle (you can just barely see the tip of it in the lower right, it’s just a plastic squeeze bottle).
With the adhesive freshly printed, place the cover inside the box, and puff the flocking fiber over the sticky area until covered. Flip over and tap to remove excess fiber.
This is what you’re left with after tapping; still too much. The water-based adhesive can be cured in a 300 degree oven for 5 minutes, then brushed clean with a soft paint brush or towel.
The final, flocked cover. It’s very visually subtle in person, but it feels really awesome.
Hope you enjoyed the process. Now I just need to bind them and Bearfight should be up for sale by the end of the month!
For those of you who are also interested in buying my upcoming thesis book, B is for Beard,
from which I’ve been posting pages this last week, I’ve set up a
pre-order special for both books. It costs quite a chunk of change to
put out the larger and larger books I’ve been working on lately -
especially since B is for Beard is two-color offset printed -
so any and all pre-orders will really help make the process a little
easier, financially. Pre-orders will also include a Bearfight! button
and whatever else I decide to throw in your package.
DESIGN EXAMPLES OF THE FLOCKING PRINT FINISH PROCESS


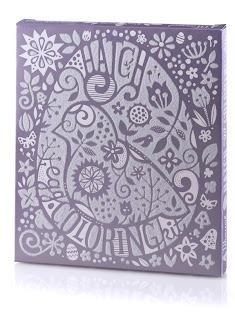
4th Annual Hatch Design Easter Egg Coloring Kit
Wonderful application of spec white flocking as a spot colour in this design which visually communicates tthe tactile texture of a "fluffy" chick (reminisant of easter) in a playful, friendly design.


"Like a Glove" Self-promotional poster
Again, another great example of how flocking can be utilised in contemporary and visually communicative ways- here, on a festive design to represent the tactile feeling of a glove or fair isle print that is so distinctive of the Christmas Season. White flocking glitter applied to solid flush blue paper stock.
FOIL BLOCKING
THE DEFINITIONS OF FOIL BLOCKING
The block is heated on press and a metallic or coloured foil is branded on to the material. Foiled logos are incorporated into many corporate identities, used especially on corporate invitations, business cards, letter headings and compliment slips.
* A highly cost effective way to add metallic colour to all or part of printed products.
* Fully compatible with laser printers.
* Ideal for Invitations, business cards, letter headings and compliment slips ect.
* We can print to order on any thickness of material.
* Ideal for use in conjunction with thermography, embossing and lithography.


http://www.underconsideration.com/fpo/archives/2011/04/montreux-cafe-identity-system.php
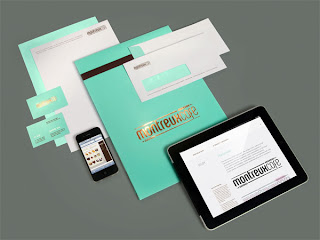
Montreux Café Identity System
Offset printing, foil blocking and laminate are used to create this minimalist branding identity. I love the combination of the turquoise spot colour with the gold foil blocking, a really contemporary and unqiue colour palette.

http://www.underconsideration.com/fpo/archives/2010/10/nature-of-america-stamp-series-limited-edition-collectors-set.php
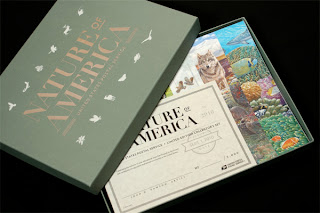
Nature of America Stamp Series Limited Edition Collector's Set
A rich, almost antiquian style colour palette mixed with the sophisticated regality of the gold foil blocking print finish adds a touch of heritage and luxury in this packaged print design.


THE DEFINITIONS OF FOIL BLOCKING
The process by which a foil is transferred to a substrate using a heated metal Die.
Foil blocking is basically metal foil (usually Silver Foil Blocking or
Gold Foil Blocking) which is used to create shiny metal foil effects on
the paper. Mainly used as a special effect to enhance the overall look
and quality of a print job.
Foil stamping uses heat and metallic film in a specialty printing process that produces a shiny design on paper, vinyl,
textiles, wood, hard plastic, leather, and other materials. Foil
stamping, also called hot stamping, dry stamping, foil imprinting, or
leaf stamping, can be combined with dimensional embossing to make letters and images on business cards, book covers, gift cards, office folders, and a whole host of professional or personal items.
HOW THE FOIL BLOCKING PRINT FINISH IS APPLIED
Foil blocking
Foil blocking has been developed using the letterpress principle. A male block is produced using zinc, magnesium, copper or brass. These are process engraved.The block is heated on press and a metallic or coloured foil is branded on to the material. Foiled logos are incorporated into many corporate identities, used especially on corporate invitations, business cards, letter headings and compliment slips.
Foiling & Embossing
Foiling and embossing can be used on the same image, firstly foiled and then embossed. Again logos are incorporated into many corporate identities, used especially on corporate invitations, business cards, letter headings and compliment slips.* A highly cost effective way to add metallic colour to all or part of printed products.
* Fully compatible with laser printers.
* Ideal for Invitations, business cards, letter headings and compliment slips ect.
* We can print to order on any thickness of material.
* Ideal for use in conjunction with thermography, embossing and lithography.
DESIGN EXAMPLES OF THE FOIL BLOCKING PRINT FINISH PROCESS


http://www.underconsideration.com/fpo/archives/2011/04/montreux-cafe-identity-system.php
Montreux Café Identity System
Offset printing, foil blocking and laminate are used to create this minimalist branding identity. I love the combination of the turquoise spot colour with the gold foil blocking, a really contemporary and unqiue colour palette.


http://www.underconsideration.com/fpo/archives/2010/10/nature-of-america-stamp-series-limited-edition-collectors-set.php
Nature of America Stamp Series Limited Edition Collector's Set
A rich, almost antiquian style colour palette mixed with the sophisticated regality of the gold foil blocking print finish adds a touch of heritage and luxury in this packaged print design.


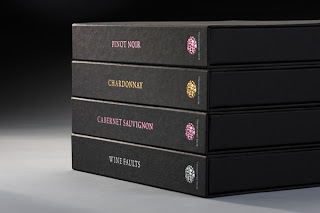
Wine Aroma Kit for Wine Awakenings.
A combination of luxurious and considered print-based item pieces, utilising the four colour process print method- with the addition of foil blocked stamped lettering on the boxes for added sophisticated and aesthetic quality.
SPOT UV VARNISH
THE DEFINITIONS OF SPOT UV VARNISH
http://www.google.co.uk/search?hl=en&client=firefox-a&rls=org.mozilla:en-US:official&biw=1280&bih=635&q=spot+uv+varnish&tbs=dfn:1&tbo=u&sa=X&ei=5oqcTrerM4KAhQeWvMGLBA&ved=0CEMQkQ4
(Spot UV Varnished) Where an area/areas are picked out in high gloss. Stunning effect, works best with matt lamination for max contrast.
http://www.printingdirect.com/information/varnishing.php
A varnish is a liquid coating applied to a printed surface (for example the outside of a presentation folder) to add a clear glossy, matte, satin, or neutral finish.
http://www.printbuyingdirect.co.uk/spot-uv-varnish.html
Ultra Violet (UV) Varnishing is a printing process used to enhance many kinds of print job with a high gloss finish. When used with the right design it is very effective and really 'add value' and prestige to your Spot UV Brochure, Annual Report or Business Card. The varnish can be applied all over (Rollercoat UV Varnish) or to to specific areas such as text or pictures (Spot UV Varnish).
HOW IS THE SPOT UV PRINT FINISH APPLIED?
http://www.printbuyingdirect.co.uk/spot-uv-varnish.html
Definition: Ultra Violet (UV) Varnishing is a printing process used to enhance many kinds of print job with a high gloss finish. When used with the right design it is very effective and really 'add value' and prestige to your Spot UV Brochure, Annual Report or Business Card. The varnish can be applied all over (Rollercoat UV Varnish) or to to specific areas such as text or pictures (Spot UV Varnish).
Spot UV Varnish (Spot UV)
Definition: Spot UV Varnish is a high gloss varnish applied to specific areas of a printed page (not all over).What is it used for? It is used to enhance the printed poduct with a high gloss effect - highlighting logos, pictures, text or just to create a subtle effect on a solid area of print. It's is most commonly used on Brochures, Annual Reports, Leaflets, and Business Cards.
At What Point do we do it? Spot UV Vanishing is a print finishing process (after printing).
How do we do it? Spot UV Varnishing is a Screen Printing Process, from the artwork a Silk Screen is made and the varnish applied to the desired areas using the screen.
More about... Spot UV Varnishing works particularly well on a cover that has already been Matt Laminated. It isn't suitable for fine detail, such as small text. Ask us about how to create the artwork for Spot UV, we can provide advice that will ensure your print job is produced smoothly with no problems.
DESIGN EXAMPLES OF THE SPOT UV PRINT FINISH PROCESS


Logo and Business card for Clock Restaurant, designed by Angelique Toner.
The design specifies, when printed, that Spot UV Varnish will be applied to the letterforms for a subtle, stylish finish.


http://www.behance.net/gallery/Falling-in-Love/45893
"Falling in Love" is a graphic illustration piece by Portuguese designer David Carvahlo.
A wonderful design alone (with great variation in textures, tones, weights of line, etc), but with the application of the Spot UV Varnish adding a lustrous and desirable print finish.
No comments:
Post a Comment